Get rid of the clutter and start to enjoy your child’s work!
How to go from a stack of original kid creations to a display that both honors their artwork, looks good in your home, and is easy to switch out as your children make newer and greater artworks and as their art styles develop and change?
As a parent of two young children and given my profession, I’m in constant search of creative ways to store and display my children’s artwork. And I know as parents you too can relate to that mountain of creativity they draw, paint, collage at home, school and camp! Their artwork deserves a special display, but more often than not it ends up in a pile along with some good intentions. Umm, speaking for myself here, but from what I hear, I’m not the only one!
I think it’s important to keep and display our children’s art work. Ok, maybe not ALL of it (even I don’t) but the best ones and the ones that show different stages of artistic development and important interests. Pint-size Pollock or not, your child needs you to celebrate his/her artistic endeavors. This will send a clear message that you’re proud of your child, and in turn give a boost of self-esteem. Here’s a compilation of some fun ideas I have found through my hours on the internet that can help you sort, save, and surrender your child’s artwork.
The number one key is to keep an oversized portfolio handy! If you don’t want to invest in anything too expensive, you can even get a cardboard box and flatten it and cut it down to a 11″ x 17″ size. As the kids bring all their creations home, simply pile them into the portfolio. In our house, we have a monthly rotation of art. So once a month I go into Samara’s room and together we decide on what’s a “keeper” and what’s a “gonner”! You don’t have to be discreet about throwing this pile away if your child has been involved in the process all along. Remember: Be a good role model. By winnowing your own stuff on a regular basis, you cultivate the idea that there are things you hold on to and things you let go of. We then choose 5/6 pieces that we rotate on our art walls.

1. Cable Art Display
We have one of these in the studio and it’s wonderful! Using clips for the art
means you can easily change the display. Our cable system is from Ikea, but any string and clip sy
stem even clothes pins and nylon string will work! The great thing about this cable
art display is that you can design its length to fit both the size of your wall and the amount of art your kid has created.
 2. Clipboards
Create a fun gallery wall with clipboards. I recently saw some really cute clipboards in the Target discount bins! Once you’re ready to change the art, it’s as easy as unclipping it and sliding in a new one. You can find unfinished letter like the one that spell “ART” at Hobby Lobby or Michaels. A can of spray paint in your favorite color and voilá you can have a fun looking display pretty quickly!
 3. Recycled Frames with Cork Backing
You can turn old ordinary frames into cork boards. Thrift shops or Goodwill are a great place to pick up all types of odd frames. Get a few different cans of spray paint from the hardware store to add color. Cork is easily available on a roll from your local office supply store. Have some fun playing with different layouts ! Tip: I would paint my cork a color as well and that creates a lovely backdrop for your artwork.

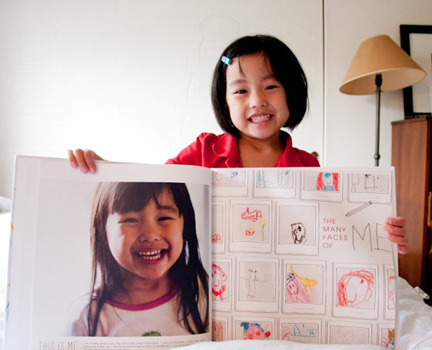
4. Photo Book
I absolutely love this coffee table book concept! Create a photo book of your kids art alongside pics of your little artist. Think about mixing in with vacation and travel photos. This one that Liz of paislee press made for her kiddo is pretty awesome.
 5. Artkive App
Artkive is an app that you can use to take, tag, and store an image of your child’s work in just seconds. You can then take your child’s Artkive and convert into a book or other great gifts and keepsakes. Perfect for grandparents and family!

